In this post, I will discuss Data Relationship Governance and its functionality in Data Relationship Management. Data Relationship Governance was an add-in to DRM 11.1.2.3 and has many features than can be very beneficial to DRM users.
Data Relationship Governance is a component within Oracle’s Data Relationship Management. DRG is a tool that allows DRM users to easily make changes to their data hierarchies. It allows users to communicate within the DRM system, which means users can view, request, and approve data changes all in the same place. DRG has four main focal points: User Roles, Access Levels, Workflow Tasks, and Workflow Stages.
There are several DRG User Role Permissions that can be assigned to DRM users. The permission with the most freedom is the “Workflow Participant”. This permission allows users to Request and/or Approve changes to the data hierarchies. The next level down in the DRG permissions is “Browse Versions”, which allows DRM users to navigate through different versions within the DRM system, but doesn’t allow them to request and/or approve changes to the data structures. Finally, there are three more permission levels: “Browse Hierarchies”, “Browse Categories”, and “Browse Properties”. These three permissions are the lowest level of permissions and there names describe what the user is able to navigate through.
In Data Relationship Governance, there are six different Access Levels that users can be given. All of these access levels build on each other, so, for example, level 3 includes all of the access rights that level 1 and 2 have. Level 6 has all of the access rights that levels 1 through 5 have. The six Access Levels in DRG are: Read, Limited Insert, Edit, Insert, Inactivate, and Add. Read access only allows users to view the data. Any user with this Access Level cannot make any changes. Limited Insert is allowed to insert a node, but only if that node has Global Properties. The Edit access level allows users to modify property values. The Insert access level grants users the ability to insert, move, and remove nodes. Inactivate allows users to deactivate and reactivate nodes. Lastly, the Add access level allows users to do all of the previous tasks, plus add or delete nodes.
Workflow Tasks are made up of an action type, properties that need to be reviewed, and validations. There are eight different Action Types a Workflow Task can use: Add Leaf, Add Limb, Delete, Inactivate, Insert, Move, Remove, and Update. These Action Types are self-explanatory and they are named for exactly the action that they perform. Workflow Tasks must be created in the Administer tab within DRM before any user can Request and/or Approve any data changes.
The last component of Data Relationship Governance are the Workflow Stages. There are four stages in total, but only three of them are required. The Workflow stages include: Submit, Enrich, Approve, and Commit. The Submit stage is where the requests for any sort of data change take place. All of the Action Types are associated with this stage except for the Update action. The Enrich stage is used to update requests that have already been submitted. This is the stage that is not always necessary to be included, and includes the Update, Insert, and Move Action Types. The third stage is the Approve stage, which is where all requests are viewed and managed. The Update Action Type is also a part of this Workflow Stage, which is why the Enrich Workflow Stage does not always need to be included. Finally, the Commit stage is where requests are approved or rejected. Only a user with the access to approve a request may view the Commit stage.
These four components of Data Relationship Governance, User Roles, Access Levels, Workflow Tasks, and Workflow Stages, are what make DRG so useful in DRM. As previously mentioned, DRG serves as a central hub for requesting and approving/rejecting changes to data structures. By setting up the User Roles and Access Levels, management does not have to spend as much time dealing with the requests and can outsource the approval process to other employees.
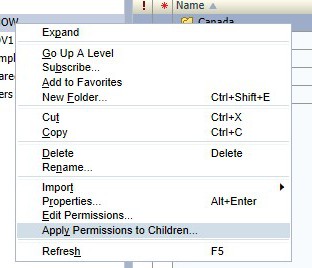
There is a quick and simple way to apply global folder permission for Financial Reporting folders.
- Simply right click on the parent folder, and select “Apply Permissions to Children”
- Update the list for Groups or Users
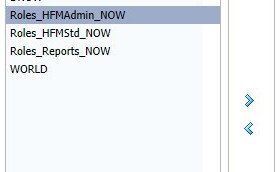
- Select the Group or User
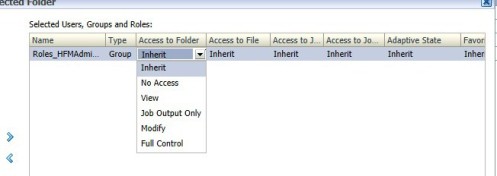
- Begin applying the permissions
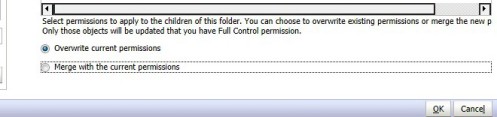
- You can also overwrite or merge the permissions

Scenario #1: Pretend your client would like to calculate inventory for the current quarter and month. For instance, if the current month is August, the quarter total includes values for July and August.
How is this calculated in Essbase? Essbase allows users to calculate period to date values dynamically, using dynamic time series. This is not a member stored in the outline, however it is a member that in enabled and associated with a generation. Typically, common time series members include YTD, QTD and MTD. Others include DTD, HTD, PTD, STD, WTD.

Scenario #2: You need to calculate quarter to date values for your client.
Enable the quarter to date member, or QTD, and associate it with its corresponding generation. This is where you will apply the “dynamic time series member.” According to the Oracle Tech Reference, a generation “refers to a consolidation level within a dimension. A root branch of the tree is generation 1. Generation numbers increase as you count from the root toward the leaf member…All siblings of each level belong to the same generation…”

You must have a dimension that is tagged as “time” in order to use a dynamic time series member. Only one dimension can be tagged as “time.” Essbase will now create a dynamic time series member called QTD and it will be associated with generation 2. This member will calculate values up to the current month in the quarter.
Instructions
1. View your outline
2. Right click on the member of your choice and click dynamic time series. In this case, I chose Qtr1 from my Period dimension.

As you can see, my dimension is tagged as time. As aforementioned, you can only apply dynamic time series to dimensions tagged as time.
3. Next, enable, assign a generation and alias name and click OK.

You have now successfully created a dynamic time series member.
Retrieving a Dynamic Time Series Member in SmartView
1. Open up Smartview, connect to your application and create an ad-hoc grid
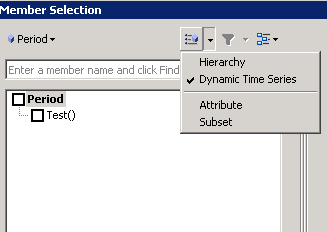
2. Click on your dimension and select “Member Selection.” You should now see a “Member Selection” window that looks similar to this:

3. Click on the outline icon on the left and select “Dynamic Time Series.” You should now see the dynamic time series member you assigned in your outline previously. For now, I am just working with one member.
4. Before you select your member and move it to the right, you will receive the following message:

5. Select your time period and click OK. Click OK again once you see the member on the right. You should now see your dynamic time series member in your ad-hoc grid.
In FDMEE, you can have multiple separate locations set up that can share mapping across all locations.
During the setup of the location, you must identify the parent location. What this means is that parent location will drive all mappings that are tied to that parent location.
When identifying the parent location, it will share that locations mapping to this new location. Any changes to mappings at that parent location will be passed along to any locations that utilize it as their parent location.

This is a streamlined way to manage mappings that can be potentially shared across multiple locations.
An easy way to distribute reports to various users outside of running individual reports or books and then emailing it out to users is by creating a batch and burst to a shared directory.
A batch can run various reports on multiple members in a dimension, adding the bursting capability you can send the report out to various users.
In order to burst a report to a shared directory, the Financial Reporting Config file needs to be updated to reach out to the shared directory. The Financial Reporting Config file is located on the server where Financial Reporting is installed.
Below are the steps:
The FRConfig.cmd can be located in the \Oracle\Middleware\EPMSystem11R1\products\financialreporting\bin folder
- Run the FRConfig.cmd (Financial Reporting Configuration) to open the Java Monitoring & Management Console Application
- Select MBeans tab select com:hyperion\Financial Reporting\Attribute
- Set the Value for ExportFolder
– syntax: FolderLabel1=FolderPath1,FolderLabel2=FolderPath2
– example: FR_Burst=\\srvtest\HFMReports$
- Restart services
Locations
In FDMEE, a Location is a level where a data load is executed. In other words, users define locations to specify where to load the data and each location is assigned an Import Format, Data Load Rules and Data Load Mappings. As discussed below, users must create Import Formats before Locations are created. The same Import Format can be used for numerous Locations. To add a Location:
- Click Add
- Assign a name
- Assign the corresponding Import Format
- Assign the Target Application
- Assign the Source System type: File
- Assign the Functional Currency: Location currency
- Data Value: <Entity Currency>
- Parent Location: To share mappings between two locations, assign a Parent Location
- Logic Account Group: [NONE]
- Check Entity Group
Note: When adding a new location, a Check Entity Group must be created.
- Check Rule Group
- Click Save
Import Formats
As mentioned above, each Location must be assigned an Import Format. The Import Format defines the structure of the source file and is executed during the source file import process. File based imports are supported for companies who do not have direct connections to their source data, but have data available from their source in a text file. A corresponding Import Format must be created before creating a Location. As shown in the image below, to add an Import Format:
- Click Add
- Assign a name
- Source System: File
- File Type:
-Fixed
-Delimited: If delimited, specify the type of delimiter (comma, pipe, semicolon, etc)
- Specify the Target Application
- Add a description if needed
- Click Save
Defining an Import Format
The image below displays an example of an Import Format with a comma delimited structure.

-The Source Column should replicate what is shown under the Target column
Note: Multiple source columns of the same dimension is acceptable. For instance, there can be three Account source columns.
-The Field Number signifies the column in the source file
-When using a comma delimited structure, the following rows can be added to define the Import Format under Mappings:
-Currency Row
-Attribute Row
-Description Row
-Dimension Row: Select the arrow to view all of the dimensions
-When using a fixed structure, the following rows can be added to define the Import Format under Mappings:
-Skip Row: This option is used to indicate rows in that file should be skipped
-Currency Row
-Attribute Row
-Description Row
-Dimension Row: Select the arrow to view all of the dimensions
-Import expressions operate on the value that is read from the source file enabling FDMEE to read and parse information in the data file. Expressions include:
-Script: Click on the pencil icon to add a script
-Sign=,-: Used to manage nonstandard numeric sign conventions, such as negative numbers in a source file
-Fill=EurotoUS: Used with the Amount field to trigger a number format conversion from ., to ,.
-Fill000: Used to fill fields with trailing characters such as zeros
For example:
Account number: 203
Expression: Fill=00000
Post Import: 20300
Script Editor
The Script Editor in FDMEE uses scripts written in Jython to assist files during import processes. FDMEE supports three types of scripts: Event, Import and Custom scripts.

Event scripts are executed when a particular event runs. For instance, to execute a script before any import, choose the BefImport event script.
1. Navigate to Script Editor (Setup) under Scripts.
2. Specify the Target Application and Technology- Jython.
3. Select Event > BefImport.
4. Select New
5. Create or edit a script
6. Click Save
This following script has been applied to remove apostrophes from data files.
import os,re
if fdmContext[“LOCNAME”] == “Location Name “:
filename = fdmContext[“FILENAME”]
inbox = fdmContext[“INBOXDIR”]
fdmAPI.logInfo(filename)
fdmAPI.logInfo(inbox)
file = inbox + ‘\\’ + filename
file_out = inbox + ‘\\’ + filename + ‘.out’
fdmAPI.logInfo(file)
fin = open(file,’r’)
fout = open(file_out,’w’)
for line in fin:
line = line.replace(“‘”, “”)
fout.write(line)
fin.close()
fout.close()
os.remove(file)
os.rename(file_out,file)
Import scripts are created when Import Formats are defined.
1. Repeat steps 1 and 2 above
2. Select Import
3. Select New
4. Create or edit a script
5. Click Save
The following script has been applied to successfully load Plan-Periodic files.
def CheckPeriodic(strfield, strrecord):
iFind = strrecord.find(‘Periodic’)
if iFind > 0:
sValue=’Periodic’
else:
sValue=’YTD’
return sValue
To apply a script to an Import Format:
- Navigate to Import Format under Integration Setup
- Select the Import Format
- Under Mappings, select the pencil icon
- In the Add Expression window,
- Expression Type: Script
- Expression Value: Choose the script
- Select OK
Updates to metadata in Data Relationship Governance (DRG) are made through workflows. Workflows contain two required stages and two optional stages. The two required stages are ‘Submit’ and ‘Commit’, while the two optional stages are ‘Enrich’ and ‘Approve’. The two required stages in a DRG workflow ensure that any update made to the metadata meets the established requirements, of which there are numerous possibilities. The two optional stages in Data Relationship Governance are supplementary to the ‘Submit’ and ‘Commit’ stages in securing metadata, but are not necessary. The ‘Enrich’ stage is used to update an already existing workflow and the ‘Approve’ stage acts as a pre-approval stage to the ‘Commit’ stage.
Securing Metadata
In order to secure the metadata, there are a few options to limit the updates that can be made. Security can be established to grant access to only the users that need permission to make the updates. Restrictions can be put in place to limit who can make updates to the metadata. These restrictions can also determine which users can see which metadata. For example, an organization may have a manager, approver, and/or requestor roles.
The manager could be assigned a ‘Data Manager’ user-role, which grants full access. They would be able to see all of the metadata, see which changes are made, and have the authority to approve or reject any of the updates. The manager also has auditing capabilities. They could see any request that is made and see which decision the approver made.
An approver could be given the ‘Governance User’ user-role. This role would allow the approver to approve or reject updates made to the metadata. The requestor could be assigned the ‘Workflow User’ user-role, which allows them to create a request and submit that request for approval. However, that is all that the requestor is allowed to do.
Another way to secure metadata is through validations. Validations establish a security check system. They can be assigned to different stages of the workflow and force the user making the request to pass the validation before the request can move on to the next stage of the workflow. Through validations, managers and upper-level users can be certain that updates made or that have been made to the metadata have passed the minimum set of requirements that the organization has established. Validations can range from anything like checking the number of characters a node name has in a request, to making sure that the request falls under a specific hierarchy within the metadata.
Auditing Metadata
There are three main tools in Data Relationship Governance that can be used to enhance metadata auditing capabilities. The purpose of these tools is to monitor and track metadata changes to let users know exactly what has taken place within the application. These tools are located within the workflow model setup page and can be adjusted at any time. In order to adjust any of the following tools, open up the ‘Administer’ tab on the left-hand side of the screen, right-click on the workflow model that you want to update, and click ‘Edit’.
The first of these tools is the ‘Request Duration’ option. This tool allows a user to set a date of when the request needs to be approved or rejected. If a certain amount of days go by, and the request has not been evaluated, it becomes ‘Overdue’.
The second tool is the ‘Claim Duration’ option. The ‘Claim Duration’ tool works in the same way as ‘Request Duration’, except a request becomes open for anyone to claim after the determined number of days have passed. A manager with the Data Manager user-role would be able to see that the request has gone into the ‘Overdue’ state or that the request is ‘Unclaimed’ and could take the necessary action to resolve the issue.
The third auditing tool offered in Data Relationship Governance is the ‘Notify’ option. This tool sends out alerts when requests move to certain stages to whoever is set up to receive the notifications. The ‘Notify’ option can be set up for the assignees, the participants, or both. This feature also allows upper-level management to be kept in the loop and know the status of every request.
There are many different ways metadata can be secured and monitored through a combination of security, validations, and auditing tools within Data Relationship Governance. The user roles control who can see and/or do what in DRG, while validations act as requirements that must be met in order to carry out an update. By creating different levels of security and adding one or more validations to each stage of the workflow, Data Relationship Governance can guarantee that the metadata is safe and secure. Management can also supervise the workflow processes with the use of the auditing tools, allowing them to take more of a back-seat approach, but also keep their foot in the door.
References
- “Oracle Data Relationship Management Administrator’s Guide,” last modified August, 2013, http://docs.oracle.com/cd/E40248_01/epm.1112/drm_admin.pdf

Here are some quick tips to check when tuning your BSO application:
1. Dimension Order
♦ Use the hourglass model:
Largest dense to smallest dense, smallest sparse to largest sparse
♦ Attribute dimensions are always last.
2. Dense/Sparse Settings
♦ Typically, your accounts and period dimensions are classified as dense.
3. Member Properties
♦ Tag all upper-level members on your accounts and period dimension as dynamic calc. This not only will impact the size of the database which affects performance, but also reduces calculation times.
4. Block Size
♦ The recommended block size is 8-100KB.
5. Fragmentation
♦ Be sure to check your Average Clustering Ratio (Right click database, Edit, Properties, Statistics). An Average Cluster Ratio of 1 is ideal in Essbase. You can achieve this number through a database restructure or by clearing your database and reloading your export file.
♦Be sure you have set configuration settings in the server environment.
6. Restructure
♦ Right click on the database and click restructure. There are three different types of restructures:
Outline
Dense
Sparse
7. Cache
♦ Your Index Cache should be equal to the size of the index file. If it is higher, you will not see improvement in performance.
♦ Use the set command SET CACHE to improve calculation performance. This command specifies the size of the calculator cache.
8. Calc commands
♦ It is recommended to If on dense members, and fix on sparse members.
♦ Use SET Commands as necessary to improve performance.
♦ When designing your calc script, keep in mind to minimize the number of passes on the database.
9. Avoid loading zeros to databases. It is best practice to replace zeros with #missings as a blank cell uses no memory as opposed to a zero.
In this post, I will discuss Security and the role is has within HFM applications. I will show how to change user access for different Security Classes, and also how to create a new user in an application. Both of these topics are very significant for assigning accessibility to your new HFM application.
The Security Class within HFM is very important when setting up your new application. They allow you to specify who is allowed to see different things within the application. You can restrict which accounts someone has access to, which entities they can see, different scenarios they can look at, which Inter Company Partners they can see, and the access to different custom dimensions. After the Security Class has been associated with a certain dimension, you can assign the user privileges to those classes. This is done in Shared Services.

Once in Shared Services, you can assign access control for users and determine which access type users can have per security class.

The Default access type is None, meaning there is no security for that user with those Security Classes. There are five access types: None, Metadata, Read, Promote, and All.

Since I am the Administrator User, I have set the access for all the classes to All.

You can also create new users within the Shared Services Console. Right-click on User to pull up that option.


Once you have created the user, you need to assign it to an application. You do so by Right-clicking the user, and selecting Provisions.

Then find and select the application you want to give the user access to.

After you find the application, you must give the user a role. The role I gave User2 was the Consolidate All with Data Role.

After you click OK, you will get a screen that tells you every role that has been assigned to that user.

From there, you can determine which access to give the new user in the existing Security Classes.

I gave User2 access to the US and EUROPE Security Classes.

Now User2 will only be able to run Consolidate All with Data in those two Security Classes.
In this blog, I will be discussing how to create a task list and also what purpose they serve in HFM. They can be a resourceful tool within the application to help manage your workload and I will explain how in the following paragraph.
A Task List in HFM serves as a folder for documents that you frequently use. This can be helpful for creating a centralized location where you can find everything you need to accomplish the current job. You could set up a task list for the month-end reporting so that it has all the reports necessary to do the monthly reporting. That would keep you from having to go through all of your documents and determine which ones you need every time. The task list keeps them all together, and you can work your way through each one with ease.
To create a new Task List, go into the application documents and select Actions.

From there, you can select which type of documents you want to place in your task list by clicking on Add. First, I put a Data Form into mine.


As you can see here, it has been copied into the task list.

Next, I placed a Data Grid into the task list.


Both the Data Form and Data Grid have been copied into the new task list.

Then, you will need to save the task list so you can have it for future use.

When you go back into the Application Documents, click on Actions again and select Refresh. You have to Refresh the page in order for the newly saved task list to show up.


Whenever you need to run the task list, you can find and open it within the Application Documents.
